How to Connect a Canon Printer to WiFi?

Canon printers are determined to deliver exceptional outcomes and are outfitted with intelligent technologies. While all the companies produce wired and wireless printers, the majority of modern models are wireless. The ease with which wireless printers may effortlessly connect to any device is commendable. Additionally, wireless printers allow users to print documents effortlessly from any location. They must be connected to a wireless network in order to use the wireless printer’s WiFi connection. Continue reading this blog post to the end if you’re a newbie and want to learn how to connect a Canon printer to WiFi.
Ways to Connect a Canon Printer to WiFi?
Before starting with any connection setup, it is essential to prepare your printer before connecting canon to WiFi. For preparation, you need to follow steps:

1. Ensure your printer is plugged and turned on: To check whether the printer is on or not, printers typically have LED lights that blink if on. In case your printer has a screen, it will also have a light guiding you if the printer is on or not.
- If the printer isn’t turning on, check if the power cable is properly plugged in.


2. Verify whether installation software is available for your printer: Most modern printers will install automatically, or you may download the software from the manufacturer’s website.
If your printer comes with a CD, you can use it to set it up.
Simply place the CD into the CD tray of your computer and follow the on-screen directions to install using a CD. To complete this step, you will need an external CD reader if your computer does not have a built-in CD drive.
How do you connect a Canon Printer to WiFi Stepwise?
Connect Your Printer Via WPS
This is the whole guide on setting up a Canon printer for wireless networking. The below instructions will make it simple for you to connect your printer to the wireless network.
- First, select the Wi-Fi option from the Control Panel on your printer.
- Second, select Wi-Fi from the LAN Settings choices.
- Next, choose the Settings menu and choose Wi-Fi configuration.
- Then, choose OK after tapping on WPS (push button method).
- Next, proceed to the router and grasp the WPS button.
- You must return to the printer and press OK in two minutes. Click Troubleshooting if the follow-up screen is not visible to you.
- Next, when the follow-up screen shows up, select the OK option.
- You may now link your PC device to the printer.
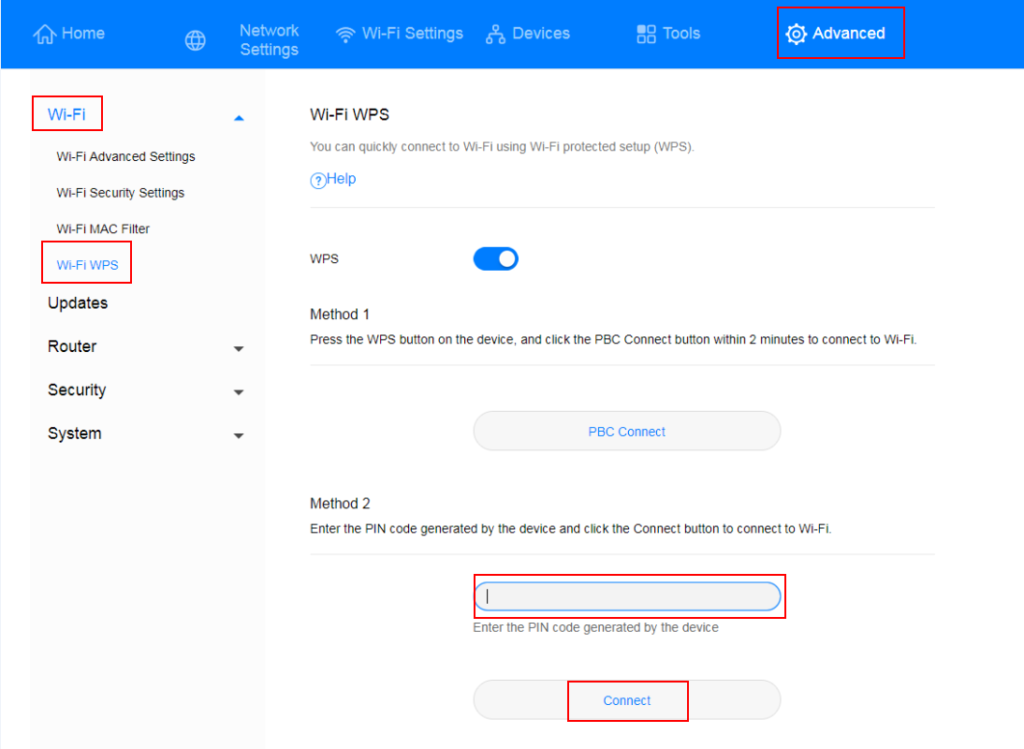
Connect Canon Printer to WiFi With WPS PIN Code
This method will allow you to connect the Canon Printer to WiFi using a WPS PIN. You can follow this process if the above method does not work for you. To establish a connection using this method:
- First, load an A4 or letter-sized sheet of paper onto your printer.
- Proceed to the printer’s Control Panel and click the Information button, as indicated below. (A Network Configuration page with a PIN code will be printed.)
- After that, you have to hit the Setup button ten times.
- Then, press the Canon printer’s color button.
- Proceed to the computer device, enter the WPS PIN CODE, and follow the instructions on the screen. (See the Network Configuration page for instructions on setting a PIN code.)
- The Network status and Signal Strength icons will turn on after the printer and Wi-Fi network are fully connected.
- After that, complete the printer setup on your Mac or PC.
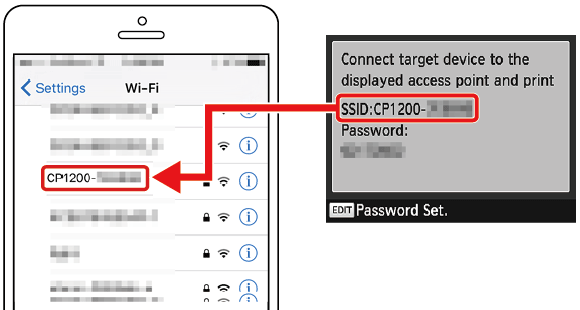
Connect Canon Printer Using password and SSID.
The printer and wireless network may be connected with the help of the password and SSID.
- Make sure the printer is turned on before beginning the connecting process.
- Move the printer’s home screen and select the Menu option in the next step.
- Click the Network Settings option after that. (If a screen prompts you for a password, enter the right number in the PIN area.)
- Select the Wireless LAN Settings option now.
- Choose Yes if the option to “Enable the wireless LAN” appears.
- Additionally, in the event that the “Direct Connection will be disabled,” choose Yes. The option “Is it OK?” appears on the screen.
- In addition, you must read the warning that appears on the screen before choosing OK.
- Then, select SSID Settings from the menu on the following screen.
- Then, select the Select Access Point option to begin a printer search for every available wireless network. (If you see an access point not found message on the screen, visit the Canon website to view your printer’s user manual.)
- Click the name of your accessible SSID LAN router. (If your wireless router is not visible, make sure the computer is setup correctly and prepared to join the network.)
- Then choose OK after that.
- After selecting the Apply option, enter the right password for SSID.
- A connected message will show up on the screen at the final stage.
- You may begin printing documents or completing the printer setup procedure on your Windows or Mac device.
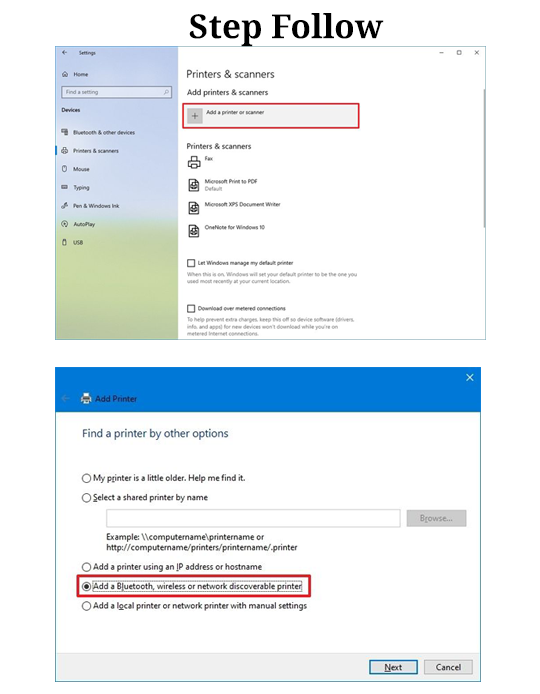
Connect Your Printer Manually Using ij start cannon.
1. Link the Internet to your printer: Usually, this entails choosing a wireless network and entering the password on the printer’s LCD display. This approach will cover the general steps to connect.
- For further instructions on connecting your printer model to the Internet, consult the instruction booklet that came with it.
- By clicking SUPPORT, choosing MANUALS from the drop-down menu, clicking Printers, and determining your printer’s model number, you may get an online version of the instruction manual for your printer on the Canon website.
2. Tap the Setup on the printer: For this, you will see a button with an icon of pliers and a screwdriver.
- Now, go to the WiFi setup.
- From there, select Manual setup: You will get this in the ‘WiFi setup’ menu.
- Make a router selection: On the printer, its name will show up in the router list.
Verify that your printer and PC are connected to the same network. Both your computer and your printer need to be linked to the same wireless network so that your printer can receive orders from your computer.
- Now, type in your router password.
- Thereafter, press OK for two seconds.
- Now, press Yes when asked to apply.
Conclusion:
You have now gained knowledge about the several ways to connect a Canon printer to WiFi. Any of these approaches will allow you to connect the printer to WiFi easily. Using any of these techniques is also an option, depending on the Canon printer you use. Utilize the wireless technique if your printer is a Canon wireless, and utilize the wireless connection method if your printer isn’t WiFi enabled.